One of my talents is that I am able to create things that I’ve seen IRL or on a picture. Due to the lack of the right tools the result might not be as sophisticated as the original one, but still good enough to do it’s job. And so I came up with the luminous idea to make a DIY basketball shooting machine.
It all started in June 2016 when I wanted to buy a shooting machine for my kids. The two leading brands, Dr. Dish and The Gun appeared, at that time being, to be somewhat over my budget. Buying one would have cost me around eight grand. So I decided to do some research to see if this could be something that I could build myself.
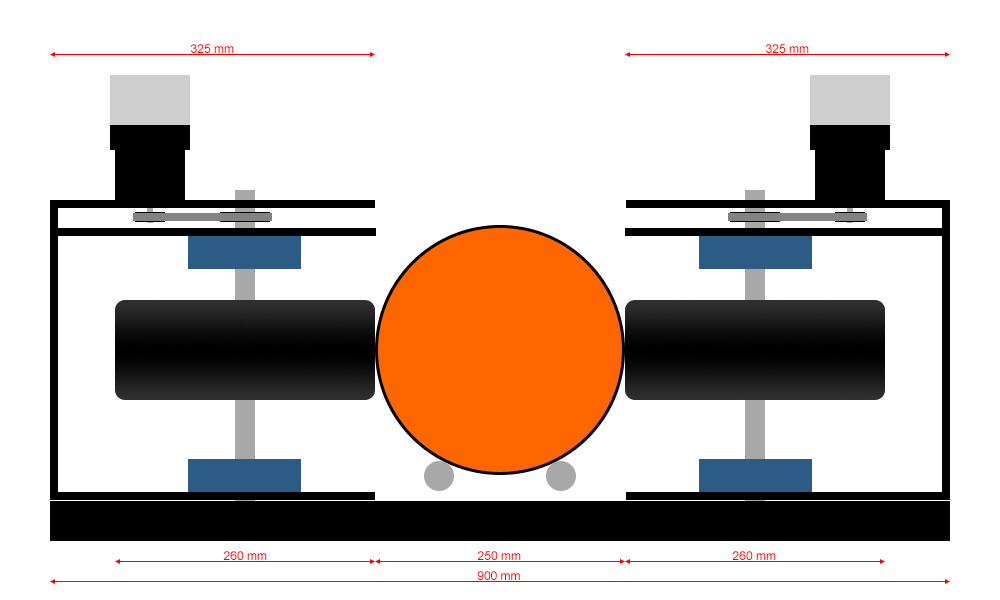
I started out investigating images and videos of shooting machines, as I didn’t have access to a real one, but I never really got a good look into the mechanics. And of course I also looked at other type of ball launching machines, such as tennis ball launchers and football launchers. At first I had the plan to shoot the ball using a lever, but later, with some help of the members from the Wetenschapsforum (Dutch science forum) I decided to create it with two spinning wheels that would launch the balls.
I actually build a miniature shooting machine that launched balls with a lever, using Lego building bricks. If I’ll find a photo or maybe even film from it, I will make sure to post it here.
Also, I recently stumbled upon this article and its a fun read. It makes you understand how my mind jumped around before coming to a definitive plan.
Some videos of basketball launchers
After I came up with a sketch I got some more advice from the forum members. I made some modifications, repeated the process, and finally came to a design that was satisfying and probably functional. So I started looking for the needed parts on the internet.
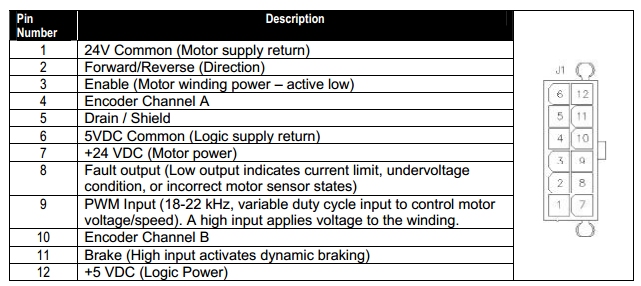
Soon I found two electric DC motors on Marktplaats, not knowing that these were PWM (Pulse Width Modulation) controlled motors and the beginning of weeks of frustration. My technical knowledge didn’t go beyond a plus – and a minus wire, and thus I was challenged to learn more about electronics. Fortunately the people on the science forum were super helpful and soon thereafter I was building my own PCB’s, trying to make the technology that was needed to get these motors spinning.

It turned out to be much more challenging than I could imagine, and it literally took ten months before I got to a point that giving up seemed more feasible than continuing. In a final attempt I stripped all the technology from the DC motors, leaving me with only two wires; a red – and a black wire. After doing some additional research I found out that I could actually order ready-made PWM controllers, which I did on AliExpress. And guess what, it worked at the first attempt!
May 2017
After I got the DC motor spinning, I ordered more parts, including aluminium profiles, plates and axes, as well as pulleys, bearing houses and timing belts. It took some time for it to arrive, as I ordered the parts from Belting Online, an online shop in England, but when it came I instantly started working on the assembly of the mechanical parts of my basketball shooting machine.
Because I only have a small shed, filled up with bikes and lots of junk, I did most of the work in our garden. And as you know, it rains a lot in the Netherlands, so combined with the limited time I had, I had to find the moments to work on the project when the weather let me. Slowly my ball launcher developed into something tangible and I became confident that I was gonna pull it off.
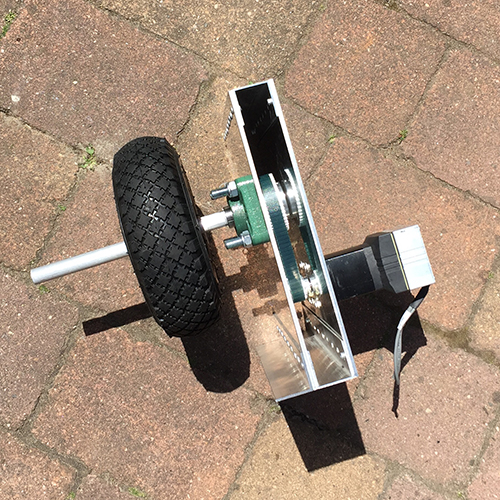
The ball launcher
Now that I’d assembled the basketball launcher I could finally fire some shots but soon I realized that it needed a lot more finetuning.
The actual catching construction, the thing containing the net that led the balls into the launcher, was initially detached from the shooting mechanism. It was a giant construction that I assembled from connecting aluminium profiles and a football goal net. This thing had all kind of defects: it was huge and therefor it took up a lot of space when we were not using it; it had to be connected to the basket; it didn’t connect well to the basketball launcher; and much more. It simply wasn’t functional.
All of this meant that it would again take more time to conclude my rebound machine. And since fall already started and because of the limited space I had (remember I said that I do most of the work in our garden), I decided to postpone finalizing the project until next spring.
FFWD to spring
Spring is in the air and the basketball shooting machine is now functional. It still needs some work and maybe some improvements, but we have already taken hundreds of shots with it. It wasn’t done over night; instead somewhere during the month of January I decided to clean-up the shed and to temporary move the family’s bikes outside. The time to finish the unfinished job has arisen!
I locked myself inside our shed, together with a much needed heating unit, and worked out a plan to finish up. The idea was to create something similar to Dr. Dish’s base. I was looking to buy a welding machine when my close friend Erdogan, whom I always bored telling about my project, offered me to use his. That was great news as it saved me a couple of hundred bucks, to the already exceeding its budget basketball shooting machine.
Off I went to the scrapyard, trying to find old iron pieces of profile which could be useful. I stumbled around for a couple of hours and came back home with a nice load of scrap to get started. Best of all it only cost me €15.
Ideas and improvements
There are a lot if things that can be better and some that actually need improvement. For instance, the wheels launching the ball are not spinning around even because of the fact that they are filled with air. The solution would be to replace the current wheels with solid rubber ones. This will stop the construction from vibrating, thus it will limit any unnecessary noice it is making. I am sure my neighbours would love that.
Shooting with multiple balls, unless making every shot, can be really tricky when each balls follows up up the other immediately. Some sort of lever letting one ball through at the time could be an option. There is some space in the middle part of the construction, but I am still clueless how to actually design and create it. Maybe I should ask my friends at the forum for ideas.